
Embossing Elegance: How to Make Invitations Look Luxurious with Texture
- Karina Gaio
- Jun 21, 2025
- 3 min read
At Timeless Impress, we believe the difference is in the details, and few techniques add more elegance than embossing.
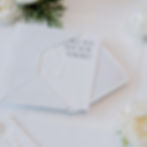
This blog is inspired by our Winter Wonderland suite, a crisp and luminous design that uses texture to tell a story. Whether you're recreating this aesthetic or simply looking for ways to add dimension to your DIY wedding invitations, embossing offers a simple, affordable path to luxury.

Why Embossing Works
Embossing creates a tactile impression — literally. It turns a flat surface into a sculptural one, catching light and shadow while adding weight and intention to your design.
You don’t need a custom machine or studio setup. With the right tools (many available on Amazon), you can add embossed beauty to your invitations from home.
What You’ll Need: Embossing Tools & Materials
These are the exact types of tools and materials I recommend to clients and creatives alike. Everything listed below is handpicked for quality, ease of use, and elevated results, without the luxury markup.
Paper & Envelopes
White Dove or Bright White Cardstock — perfect weight for embossing without creasing
Bands & Layers
Thick Vellum Paper – 92lb — ideal for belly bands or layering texture over text
Printing
HP Color LaserJet Pro 3201dw — handles heavier cardstocks with crisp printTip: Use the manual feed slot and set paper type to “Heavyweight” for best results.
Embossing Machines
Anna Griffin Empress Elite Die Cutting Machine – premium electric option
Sizzix Big Shot – reliable manual embossing tool
Embossing Folders (Choose Based on Theme)
Labels & Custom Touches
Printable Matte Clear Adhesive Paper — for minimalist monograms or return address seals

Timeless Impress Tip: Plan your paper size based on your embossing folder.
Most embossing folders are 5”x7” or smaller, so trimming your cardstock slightly can help avoid creased edges and ensure better alignment. It also gives you more control over your composition, especially helpful if you’re layering with vellum or ribbon.
You can even elevate pre-printed invitations by embossing the border or backing panel. Just a touch of raised detail can transform a basic print into something refined and intentional.
Not Ready to Design from Scratch?
Start with a printable template from a site like Zola or The Knot, then make it your own by:
Embossing the borders
Adding a vellum belly band
Pairing with Euro-flap envelopes or wax seals
It’s all about layering meaning into the details. Even a template becomes uniquely yours with the right touches.
Want more?
Explore our full series on accessible techniques for high-end looks:
Or return to the DIY Invitation Guide for more creative paths to personalization.
Karina Recommends
Every product featured here is handpicked based on over 30 years of experience designing bespoke wedding stationery. I only recommend tools and materials I’ve used or would confidently use in my own studio.
By shopping through these curated links, you're not only supporting your creative journey — you're also supporting mine. As an Amazon Associate, I may earn a small commission from qualifying purchases, at no extra cost to you.
A portion of all proceeds goes to UNICEF, helping us extend the spirit of thoughtful design to causes that matter.
Thank you for being part of this creative, conscious community
— Karina